Within hours of finding out I was pregnant, I think I started planning the nursery. Like anything else I have 9 months to decide upon, I changed my mind 100 times. The first decision I made and stuck with was the furniture. We thought the best option was to invest in the convertible crib. After all, you can use it longer. And who doesn’t want to get the most for their money. We also didn’t want to buy furniture that cost more than our bedroom furniture. I guarantee we love this kid, but I think some things are borderline ridiculous. Little did I know, a woodchuck would soon take over my perfectly simple little forest of a nursery. How much wood can a baby woodchuck chuck?
 The first time I saw the damage, I could have cried. Instead I laughed at all the little brown specs of finish on the woodchucks face. Then I built a bridge…. or crib rail cover.
We researched rail covers. Everything was a little pricey for something he would just keep biting. Or I thought it was too cheap looking. Or there were toy attachments and we don’t want him to think crib time is play time. So… I made one.
Fleece DIY Crib Rail Cover:
Materials: 1/yd fabric, scissors and 30 minutes
I went to JoAnn’s Fabric on the hunt for fleece. I chose a basic green color that would match the bedding. If you consider a pattern, dont use anything too busy. You may not be able to see much of the pattern in the final product. I bought 1/yd for $5.99. Beats the heck out of $15-30 store bought covers.
Step 1: Fold the fabric in half, lengthwise. Depending on the length of your crib, you may need to trim excess off the ends. Don’t cut it too short or just right, may come out a little short in the final product.
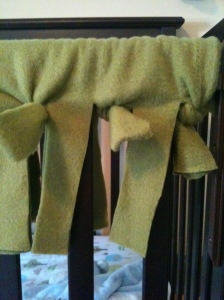
Step 2: Make sure your fabric is draped evenly on both sides. Starting on one side. Cut slits alongside each of the crib rail slats (right and left). Don’t cut any higher than the bottom of the top horizontal rail. Do this for both sides of the fabric. You will have a strip that covers a slat and a strip that covers the space between.
Step 3. Tie the strip you just cut on the front to the strip on the back. I just double knotted them. Don’t worry about the strips covering the slats, we will handle that soon.
Step 4: Continue cutting slits and tying strips along the rail.
Step 5: Once you have all the knots tied. Cut the excess strips off.
Step 6: I recommend trimming the ends of the knots. Don’t clip them off, just tidy them up and even them out.
Step 7: Look….. you just made a crib cover that’s cute, comfy and cost $6!
When I laid the woodchuck down, his room was dark. I have a feeling he’s going to be disappointed he can’t finish his carving project.


I just bought some fleece fabric this evening, and it’s being washed right now so I can make up some rail covers tomorrow! My daughter thinks she’s a little beaver! 😉 Great tutorial! Thank you!
Hope you had success!
WOW! So glad I found this! My little guy has been doing the same thing and the crib rail covers you can buy are like $40-50 for front and sides. I plan to try this. Thanks!
Making this tomorrow! Thanks!
Just bought some fleece fabric this afternoon for my twins’ cribs. I made covers for both of their cribs in under 30 minutes! This was such an awesome post…thank you! I totally almost bought the expensive fabric covers and am so glad I didn’t!! I am posting pics of the them on my blog and you can see them at http://www.thebaileybrag.com
Thanks again!
Kayce
So glad it was helpful!! It made my day to know that it made your day! Enjoy your double blessings 🙂
Pingback: DIY Crib Rail Covers @ The Bailey Brag
We were borrowing our crib, and my daughter was the same way! I took an extra minky bumper pad we had in the closet and draped it over, then I secured it with cute silky ribbon. This is cuter and more intentional-looking, though 🙂
I’m soooo glad to I’m not the only one with this problem. LoL unfortunately I also know my daughter would have this rail cover down in no time. I’m glad to read there are things out there though for this. I just came across this on Pinterest and thought. Hey! I feel better now. 🙂
yay! my crib looks the same, and all the covers i have found are so expensive!!! i probably will have to do all four sides-she is a busy chewer and thinks it is hilarious! i am going to try this out though, thank you!!!